11. FISH HARVESTING FROM PONDS
11.0 Introduction
1. Farmed fish can be harvested in several ways, either from a pond filled with water, or drained, according to your needs and circumstances.
2. You will have to crop fish without draining the water totally (see Section 11.1):
- in ponds that cannot be drained by gravity, unless you are prepared to use a water pump;
- whenever you want to make a partial harvest by capturing the largest fish to thin out the stock, increasing living space and availability of natural food for the fish left in the pond;
- for monitoring your fish stock regularly, for example checking on their growth and the food conversion efficiency (see Sections 16.1 and 16.2);
- for management purposes such as fishing brooders from broodstock ponds for spawning or cropping fish fry from spawning ponds where mature fish are left breeding on a continuous basis;
- because of water shortage, when not enough water is available for refilling the pond for a next production cycle.
3. To harvest your fish by draining the water completely, usually you need to have a drainable pond. In such case, all the fish present are removed from it, being harvested either inside the pond or outside. You will learn more about these methods in Sections 11.2 and 11.3.
4. The way to harvest a pond also greatly depends on the kind of fish it should yield.
(a) If it should yield live fish such as juveniles for stocking, brooders for spawning, or table fish to be sold alive:
- during harvest, stress to the fish should be reduced to a minimum, and
- after harvest, fish should be transferred to good water as soon as possible, for transport and, if necessary, for storage.
(b) If the fish are not to be kept alive, as in the case of most table fish, local marketing considerations become important. Even then, a good harvesting technique will make it easier to produce good quality fish.
5. Here are some general suggestions for improving your results, whatever type of harvesting you carry out.
(a) Start early in the morning when it is cooler and stop before it becomes too hot.
(b) Keep your fish in clean water as much as possible:
- avoid walking into the pond more than necessary;
- bring in additional clean water from outside the harvested pond;
- rinse muddy fish well, before storage.
6. For improved results during a total harvest from a drained pond:
- stop feeding your fish two to three days beforehand;
- manage your pond for efficient draining by good maintenance of its bottom slope and drainage channels;
- remove water slowly and regularly, enabling the fish to follow it towards the outlet where they should concentrate;
- at the end, collect fish from the water pools and muddy bottom, if necessary.
11.1 How to harvest fish without total draining
1. You can harvest fish without totally draining a pond in one of two ways:
- by treating the pond water with chemicals; or
- by using fishing gear.
2. Select the best way according to your needs:
- if you need fish alive you will have to use fishing gear;
- if the fish do not need to be harvested alive, you may also use chemicals.
3. You have already learned in a previous chapter of this manual (see Section 4.7) how to use certain chemicals to control animal pests in undrained ponds. You may use a similar method to stun your fish. You can easily harvest them as they come up to the water surface, for example using long-handled dip nets. Rinse the fish well in clean water before using them for food.
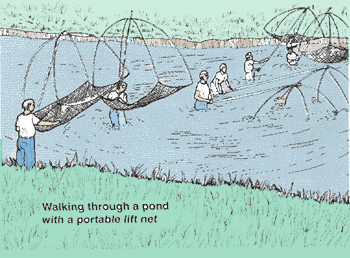 |
4. You have also learned in a previous chapter (see Sections 8.2 and 8.3), about fishing gear such as seine nets, lift nets, cast nets and traps that you can use to harvest live fish. You can also use gill nets and hook and line to catch fish for food. Remember that in some cases, it will be easier to harvest the fish when they are concentrated in a smaller area of the pond, for example within a seine or another type of mobile barrier (see Section 8.3).
 |
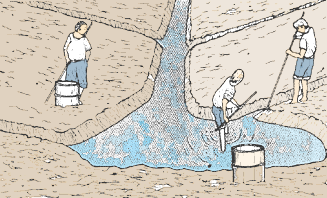
11.2 How to harvest all fish within a draining pond
1. If the pond can be completely drained, you can harvest fish in the deepest part of the pond, in front of the water outlet. This simple method is usually preferred in drainable ponds:
- when the outlet pipe across the dike is small (internal diameter under 20 cm); or
- when the pond is larger than 5 000 m2; or
- when the local topography does not easily permit the use of harvesting structures outside the pond (see Section 11.3).
Designing your catch basin
2. The method consists in concentrating the fish to be harvested within a small depression, built in front of the outlet. This is called a catch basin. Remember the following points when designing one:
(a) Its volume should be enough to contain all the fish to be harvested. You can reduce the volume required by planning some partial harvests and using fishing gear before the final harvest.
(b) Its depth should be at least 30 cm.
Size of catch basin according to pond size
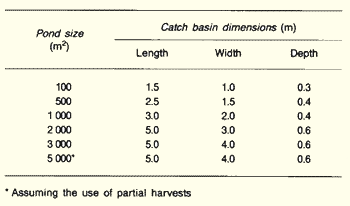 |
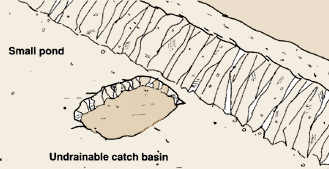
(c) In small ponds, you may use an undrainable catch basin from which you can easily bail out water, for example with buckets.
 |
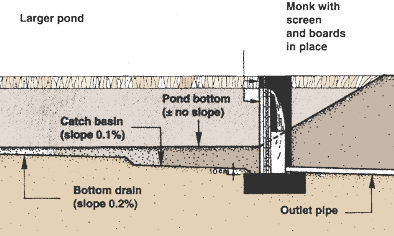
(d) In larger ponds, it is best to use a totally drainable catch basin. Design the ponds so that the level of the sloping base is at least 10 cm higher than the bottom of the outlet entrance. Usually, large fish are harvested from the catch basin, while small fish are allowed to pass through the pond outlet to be harvested behind it.
 |
Building your catch basin
3. You can build a catch basin in various ways.
(a) A simple undrainable hole is useful in small rural ponds.
(b) To make the catch basin stronger, reinforce the edges with vertical poles.
(c) A long drainable trench, parallel to the dike but 5 to 10 m in front of its inside toe and at least 50 cm deeper than the floor of the bottom drains can also be built. Make it wide enough for easy netting of the fish. Cut a slope in the side walls. Design its floor at outlet level or a little higher.
(d) To make the catch basin more permanent and easier to use, line its bottom with a 5-cm layer of cement concrete (see Section 3.4, Construction, 20).
(e) To make it fully permanent, line its walls with bricks or cement blocks and concrete its floor; leave some openings at pond bottom level in the side walls for easier harvesting.
Note: the catch basin may be located either at the centre of the dike or in one corner of the pond, depending on the location of the deepest part of the pond and accordingly its water outlet (if present).
Catch basin located at the corner of a pond
 |
 |
Protecting your catch basin from siltation
4. If you do not take care, very soon the catch basin will be filled with soil and mud taken away from pond dikes and bottom through wave action and underwater currents (see Sections 4.2 and 4.3). To protect your catch basin from such siltation, you may do one of the following.
(a) Build low barriers around it, made of stones and gravel. Leave some openings to make the harvesting easier.
(b) Build side walls around it, higher than the surrounding pond bottom. You can use wood, bamboo, bricks or cement blocks. Leave some openings.
(c) Feed your fish at the catch basin. Their active swimming and burrowing will help prevent soil particles from settling in.
(d) Place your catch basin near the dike facing prevailing winds. Wind-induced bottom currents will carry away muddy water towards the opposite dike (see Section 2.5).As far as possible design your ponds accordingly.
 |
11.3 How to harvest fish outside a draining pond
1. If the pond can be completely drained, you can also harvest fish outside the pond at the end of the outlet structure. This may be preferred to the above method if:
- the pond is smaller than 5000 m2 and it is not practical to make an internal catch basin;
- the pond is larger, but it is possible to transfer successive batches through the outlet without stress;
- local topography provides enough differences in levels and additional space to allow harvesting behind the outlet (see Chapter 10, Construction, 20).
2. The outlet structure (pipe or sluice) should also:
- be big enough to let all the fish through quickly without stressing them (more than 20 cm in small ponds or 40 cm in large ponds); or
- have its outlet end above the water level in the drainage canal; and
- have a floor slope of at least 1 percent.
3. Although there may be some difficulty in having the fish willingly pass through the outlet, particularly if it includes a pipe length, this method may have advantages:
- it gives good access to a road for fish transport;
- water is kept cleaner, if one does not wade inside the pond while draining;
- it can be used for the storage of fish, if good water is available;
- it can be used for grading fish by sizes (see Section 12.7).
Simple and portable harvesting equipment
4. One of the main advantages of this harvesting method is that simple and portable equipment can be used to crop fish from small to medium sized ponds such as:
- woven baskets;
- pieces of netting material;
- a harvesting box, which you can easily make yourself from wood and mesh material (plastic or metal). Adapt its overall size and the mesh size to the expected fish harvest. For fingerlings, for example, you may build one 120 x 56 x 50 cm, while for table fish make it 150 to 200 cm long, 60 cm wide and 60 to 75 cm high. Use a strong wooden frame. Build the bottom from smooth boards. Cover three sides with mesh material; mesh which is too fine would hold up the flow of water. In the front, attach a jute or canvas sleeve to be fixed over the outlet pipe, or build a projecting lip to fit into the sluice outlet.
 |
 |
Permanent harvesting basins
5. For a larger fish crop, a more permanent external structure for harvesting fish may be justified. Such a structure is called a harvesting basin.
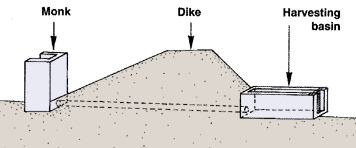 |
6. When designing a harvesting basin, keep the following in mind.
(a) The level of the floor should be from 40 cm (ponds up to 1000 m2) to 60 to 70 cm (ponds larger than 1000 m2) below the level of the outside end of the outlet. This level difference is called the useful depth of the harvesting basin.
(b) The top of the water level in the drainage canal behind the basin should always remain lower than the basin's floor level.
(c) Calculate the dimensions of your harvesting basin according to the size of the pond upstream (see the chart below).
 |
(d) If you build several harvesting basins on your fish farm, standardize their dimensions as much as possible, in particular their inside widths and total depths.
Schematic diagram of a permanent masonry harvesting basin
 |
(e) At the downstream end, build two pairs of grooves to be fitted with screen and boards. You may add one extra pair of grooves for large ponds, to make it easier to exchange screens for cleaning during the harvest.
(f) If you wish also to use your basins to size and grade your fish, additional pairs of grooves for screens are necessary (see Section 12.5).
(g) To reduce costs, you can build only one harvesting basin to crop several ponds (see paragraphs 8 and 9). Clean water will be then easily available to keep your fish in good health.
Building a harvesting basin
7. You can easily build a harvesting basin yourself, with the assistance of a mason if necessary.
(a) Build the foundation:
- extend the axis of the outlet structure beyond the dike, staking it out with pegs and string;
 |
- just below the bottom of the outlet, dig to a depth equal to the useful depth of the harvest basin plus 16 cm, for example 40 cm + 16 cm = 56 cm;
 |
- dig out and/or fill up the rest of the rectangular area as much as necessary to create a horizontal platform;
- prepare the steel reinforcement of the foundation, using 6-mm steel bar or equivalent steel mesh (see Section 3.5, Construction, 20);
 |
- prepare lean concrete (see Section 3.4, Construction, 20) (in this example you will require about 0.6 m3);
- fix wooden forms wherever necessary to contain the concrete foundation, about 16 cm deep;
 |
- place a first layer of concrete 8 cm thick and tamp it well;
- place the steel reinforcement and immediately place a second layer of concrete about 8 cm thick and tamp well;
- cure the concrete properly (see Section 3.4,Construction, 20).
(b) Build the three side walls up, set in at least 5 cm from the edge of the foundation. Use for example 15 x 20 x 40 cm cement blocks and cement mortar (see Section 3.3, Construction, 20). Seal well around the outlet structure.
(c) Cut out or fix the pairs of grooves you require on the inside walls.

(d) Plaster the surface of the walls well with an impervious mortar. Give particular attention to the finishing of the grooves (see Section 10.1,Construction, 20).
(e) If necessary, protect the area downstream from the harvesting basin against erosion, with stones and gravel, for example.
 |
Using one harvesting basin for several ponds
8. A single harvesting basin is often designed for the cropping of two adjacent ponds. It can be built in one of two ways.
(a) It can be placed next to the drainage canal, set into a horizontal platform that runs parallel to the dike. This platform can be used for light transport by covering harvesting basins with strong wooden planks while not in use. Alternatively a road can be built on the other side of the drainage canal and connected to the harvesting basin by a walkway over the canal.
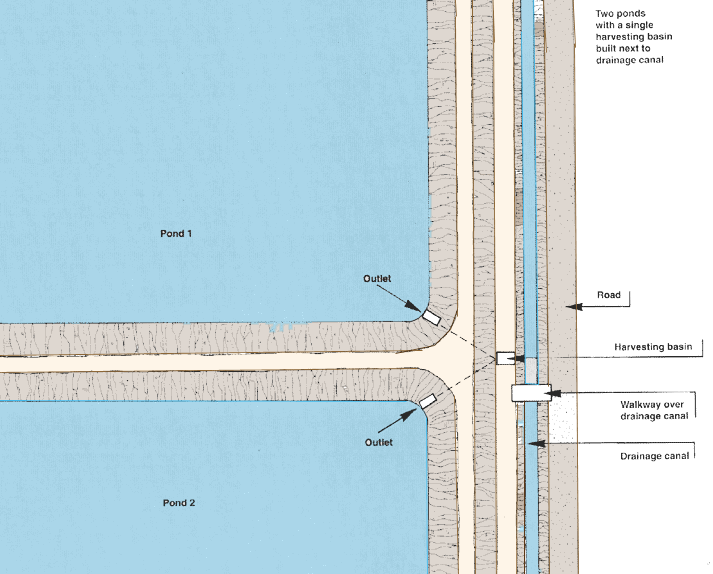 |
(b) It can be placed in the drainage canal, designed to allow the canal to continue draining water from other ponds while the basin is in use. Draining water flows through the upper levels of the harvest basin. A road can be conveniently built along the drainage canal for efficient collection of the harvest. Fresh water can be easily kept flowing through the harvesting basin from upstream ponds.
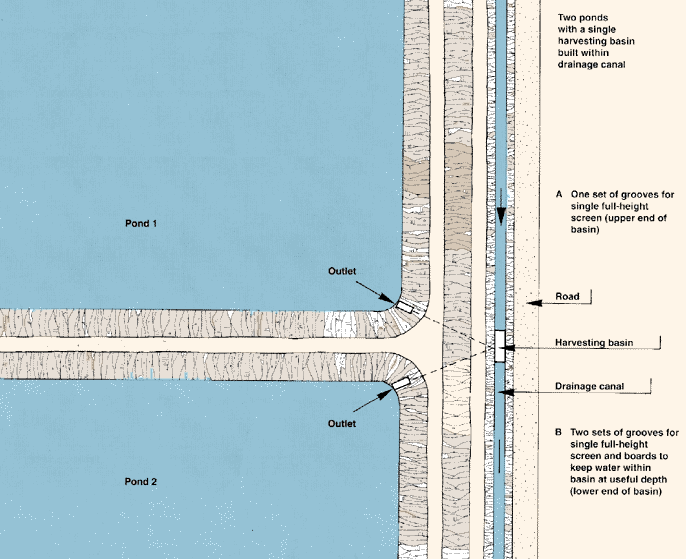 |
Note: one harvesting basin may also be designed for cropping more than two ponds; for easy use one end of the basin should give direct access to a working and loading platform and a good farm road.

Improving your harvesting
9. If you plan to produce live fish from your pond, such as broodstock or fry/fingerlings for stocking, you should endeavour to keep them in good health by reducing stress and providing well oxygenated water during the whole harvesting process. There are several ways to improve conditions.
(a) You can provide an ample supply of good water from a source outside the pond being drained. This is especially useful towards the end of the pond draining phase, when the fish begin to be crowded in the harvesting basin, and the water quality deteriorates. You may bring additional clean water:
- from a neighbouring pond if the harvesting basin is common to more than one pond;
- by pumping fresh water from any conveniently available source, using for example a small portable pump;
- from upstream ponds, if the basin is built in a drainage canal;
- from a special water canal or pipeline, branched on one of the feeding canals, which brings fresh water to the harvesting basin as required, using a three-way box in the feeding canal (see Section 8.7, Construction, 20).
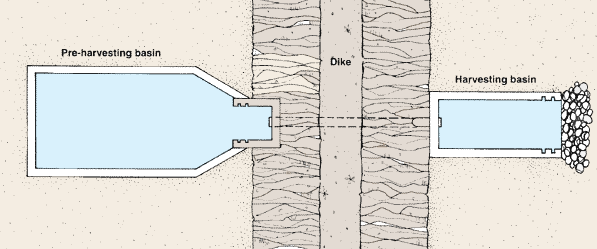
(b) You can use a pre-harvesting basin inside the pond in front of the outlet, and a harvesting basin outside the pond at the same time. When draining the pond, first concentrate the fish within a pre-harvesting basin, a simple catch basin 10 to 50 cm deeper than the bottom drains (see Section 11.2), letting some fresh water run through the main bottom drain at all times. Then, in a second stage, bring the concentrated fish through the outlet structure and into the harvesting basin. Keep fresh water running through continuously.
(c) You can ensure that transport capacity matches the harvest quantities. If transport capacity (buckets, tanks, etc.) is limited, plan your harvest in stages. Use partial harvests, or retain some stock in the pre-harvesting basin, or partially refill the pond to provide short term storage until you are ready to transport the remaining stock.
 |
No comments:
Post a Comment