How to Implement an Effective Chain-wear Monitoring Program
Chain-wear monitoring has been a part of equipment reliability programs
since the first link was forged. It is such an integral part of an
organization’s reliability program that it has become part of industry
slang as in the phrase, “A chain is only as strong as its weakest link.”
Chains are a part of almost every industrial process. They are found in a plant’s material-handling transportation system, key components in the operation of hoists and cranes, or as a part of the connection that controls a safety stop device.
Regardless of its function, the failure of any component that makes up a chain is costly to the owner, if not disastrous. Even though we would all agree that a chain failure is undesirable, modern industry’s chain-wear monitoring has remained varied in its approach and frequency.
Typically, chain reliability inspections are applied through a periodic inspection sampling procedure or replacement schedule. Visual inspections are commonly applied to the inspection of chain for wear identification, which is time-consuming to accomplish with tremendous dependence on the inspector’s experience, attitude and processing knowledge.
Technology exists that makes this costly approach no longer the only available avenue for chain monitoring to today’s maintenance departments. The application of infrared photoelectric optical systems allows for inspections that are more precise, less expensive and result in trending information to reduce failure opportunities.
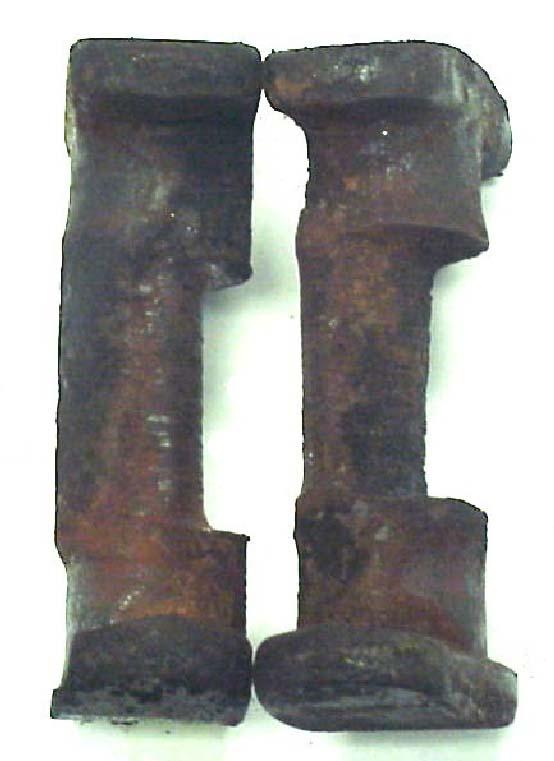
Examples of worn chain pins identified through the use of an infrared photoelectric chain-wear monitoring system.
The applications of this technology are certainly vast and varied in nature. The basic principle relies upon an infrared light source (transmitter) that generates a pulsed IR beam to a series of infrared sensors (receiver), which in turn monitor that beam. The combination of the transmitter and a receiver is referred to as a photoelectric detector.
The transmitter and the receiver are installed on opposite sides of the area to be monitored, and a signal is generated when the receiver detects obstruction of the pulsed infrared beam. A car headlight and a photocell could be used in a science project to create a very crude photoelectric detector.
The addition of infrared light to this process is due to its increased receiver sensitivity and penetration. Infrared light is a form of electromagnetic radiation similar to radio signals, visible light and X-rays. While infrared energy is similar to visible light and shares many of its characteristics, infrared energy is invisible to the human eye due to its difference in wavelengths. Infrared energy has wavelengths of 0.75 microns to 1 millimeter.
The covers on photoelectric detectors are made of special materials that are designed to block out visible light while allowing maximum penetration of IR energy. This is what allows the use of infrared photoelectric detectors on a well-lighted factory floor or even in direct sunlight.
Sampling plans are dependent on the sample providing information that is consistent with the condition of the entire system. Limiting inspection to a 10-foot section of chain within a 1,000-foot-long system sets up a situation where the likelihood of actually sampling the area of worst wear provides detection “odds” that even a Las Vegas gambler would find unacceptable.
Another concern is how accurately measurements are being produced when the measurement device is a standard hardware-quality tape measure. The historical alternative — visual inspection of the chain — can certainly identify chain wear, but once again can the production schedule tolerate the extreme downtime of such a labor-intensive approach, which needs a stationary chain to do an adequate inspection? Many types of chain are lubricated or painted, and those same coatings that protect chain from wear and corrosion mask typical wear indicators when performing visual inspections.
The last approach that is often used is that of periodic replacement based on chain age. This system of assuring chain reliability may help to reduce production downtime, but the cost of replacing reliable chain just because it is due can never be recovered.
The unit pictured below is a portable battery-operated device capable of monitoring all combinations of 3-, 4- and 6-inch chain. Alternate units are available that are designed for single-pitch chain. These monitors are capable of in-motion monitoring of chain to allow the inspection to be performed without disruption of production.
If permanently installed units are utilized, continuous monitoring of the chain can be accomplished instantaneously, identifying any chain links that exceed the programmed limits. Both status monitoring units and permanently installed units identify any link that is outside of preset size lengths through illumination of alarm lights identifying the specific problem area. Most units will provide the operator with options as to how data can be processed, including alternate avenues for monitoring, data review and problem-area identification.
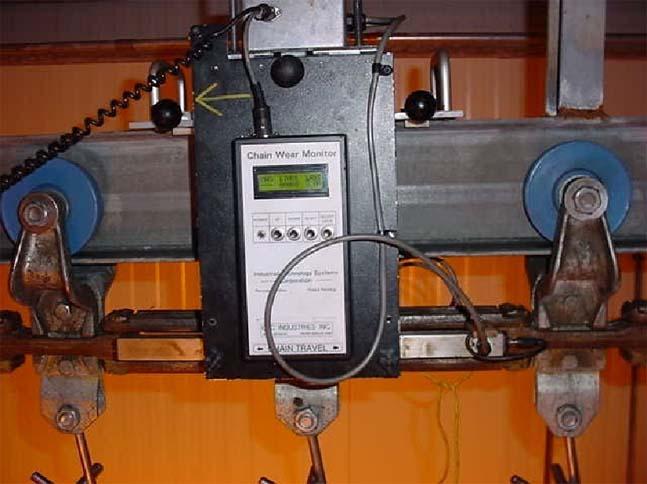
A portable infrared photoelectric chain-wear monitoring system mounted on a conveyor.
Automated abnormality identification and marking systems identify each link that is above the wear threshold, and if combined with trend-analysis software monitoring, either periodic or continuous scanning will allow for planned replacement of chain only when it is truly needed. Trending software requires a defined start/stop point to enable accurate comparisons. This is usually accomplished through a uniquely identified link installed in the system.
An option for start/stop link identification can be accomplished by permanently mounting a magnet assembly in the chain itself, which will automatically signal the unit to start and stop the data-recording sessions each time the magnet passes unit sensors. This option provides easily understandable data presentation.
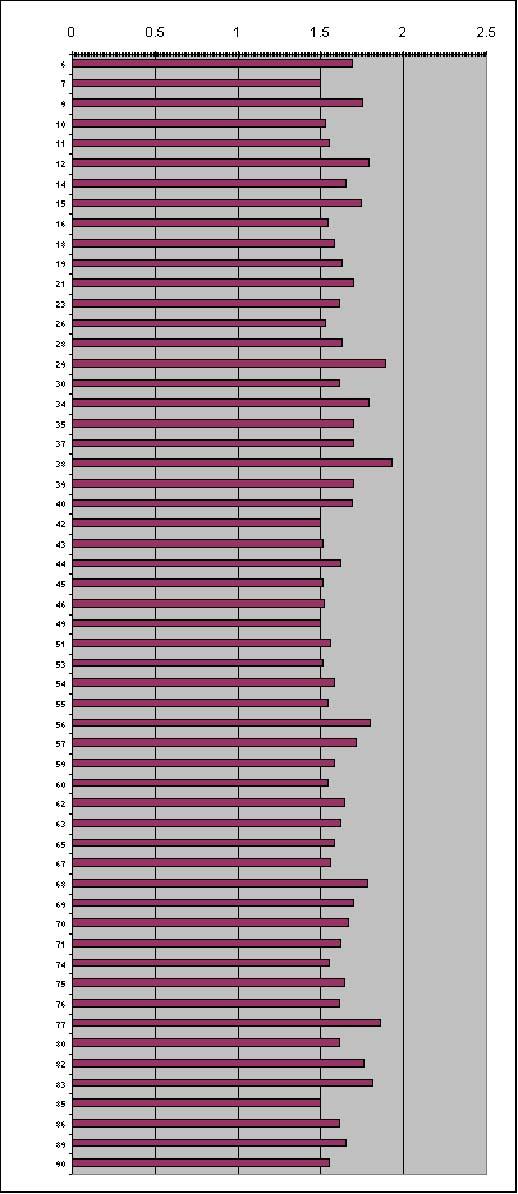
An example of reporting software showing a bar graph of link set measurements.
Several unique features that can be obtained from specially designed software allow for valuable analysis tools such as adjustable span length acceptance criteria, data-recording measurement ranges (individual link, individual link sets or 10-foot sections), trending overlay and charting options.
A concern that should be recognized is that wear may or may not be evenly distributed across that measured section of the chain. The wear on one link may be much more severe than on an adjoining link. This type of condition presents the possibility of a chain on the verge of failure measuring well within acceptable tolerances.
The use of individual-link measurement technology eliminates this type of error, increasing the reliability of the inspection and reducing the risk of catastrophic chain failure. A scanning infrared photoelectric system provides accuracy within 0.02 inches. This is even more significant when the user recalls that this is being measured on in-motion chain.
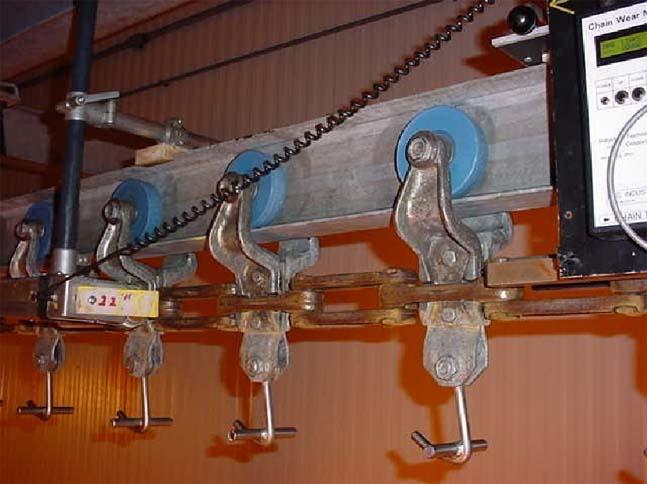
This system is equipped with an automatic paint-sprayer marking system designed to mark individual links that are not found to be within acceptable tolerance limits.
Depending on the type of unit being inspected, operator training needs to address powered chain unit operation (conveyors, cranes, lifts, etc.), unit installation, line walk-down requirements, software operation, file storage and recovery, and data interpretation. Often two-sided access to chain is not possible and may require sight cut-outs. This operation requires an individual who understands the load requirements of various types of units to prevent structural weakening of required supports. Since this type of inspection is reliability-based and is not a code, requirement acceptance criteria need to be established in order to provide useful data.
The development of maximum growth tolerances requires individuals with experience in its development. Recommended training and experience may vary, but a good guideline would include 30 hours of classroom-style training covering all related subjects and a minimum of six months of hands-on experience before considering an individual qualified to perform inspections independently.
The utilization of infrared photoelectric technology to accomplish chain monitoring is a major improvement leap in this important part of a company’s reliability program. The cost savings alone justify the research as to the applicability of this technology.
A recent example of cost savings was developed by a meat-processing company that used the nominal 10-foot measurement technique for inspection prior to implementation of this technology. Over a two-year period, their incidents of breakdown were reduced by 100 percent (from an average of seven breakdowns per 12-month period to zero unscheduled breakdowns).
It was calculated that each breakdown cost the company $2,416 in maintenance repair costs, $3,765 in lost labor time and $1,184 in production revenue. The total cost to the company was $51,555 annually. Additional cost savings were realized in chain-life extension, replacement-part inventory reduction, planned maintenance scheduling and extended-chain replacement.
This is only one of many examples in which, if chain dependability is critical to plant production or safety of personnel, the utilization of individual-link inspection methods are self-funding in their application.
Chains are a part of almost every industrial process. They are found in a plant’s material-handling transportation system, key components in the operation of hoists and cranes, or as a part of the connection that controls a safety stop device.
Regardless of its function, the failure of any component that makes up a chain is costly to the owner, if not disastrous. Even though we would all agree that a chain failure is undesirable, modern industry’s chain-wear monitoring has remained varied in its approach and frequency.
Typically, chain reliability inspections are applied through a periodic inspection sampling procedure or replacement schedule. Visual inspections are commonly applied to the inspection of chain for wear identification, which is time-consuming to accomplish with tremendous dependence on the inspector’s experience, attitude and processing knowledge.
Technology exists that makes this costly approach no longer the only available avenue for chain monitoring to today’s maintenance departments. The application of infrared photoelectric optical systems allows for inspections that are more precise, less expensive and result in trending information to reduce failure opportunities.

Examples of worn chain pins identified through the use of an infrared photoelectric chain-wear monitoring system.
Explanation of the Photoelectric Process
Infrared photoelectric technology is utilized in many aspects of our daily lives without most of us even being aware of its existence. Examples of photoelectric detectors include the sensor components on the most advanced types of security systems, safety controls on door-closure systems for elevators and transit systems, and even as bottle fill-level monitors in high-production bottling systems.The applications of this technology are certainly vast and varied in nature. The basic principle relies upon an infrared light source (transmitter) that generates a pulsed IR beam to a series of infrared sensors (receiver), which in turn monitor that beam. The combination of the transmitter and a receiver is referred to as a photoelectric detector.
The transmitter and the receiver are installed on opposite sides of the area to be monitored, and a signal is generated when the receiver detects obstruction of the pulsed infrared beam. A car headlight and a photocell could be used in a science project to create a very crude photoelectric detector.
The addition of infrared light to this process is due to its increased receiver sensitivity and penetration. Infrared light is a form of electromagnetic radiation similar to radio signals, visible light and X-rays. While infrared energy is similar to visible light and shares many of its characteristics, infrared energy is invisible to the human eye due to its difference in wavelengths. Infrared energy has wavelengths of 0.75 microns to 1 millimeter.
The covers on photoelectric detectors are made of special materials that are designed to block out visible light while allowing maximum penetration of IR energy. This is what allows the use of infrared photoelectric detectors on a well-lighted factory floor or even in direct sunlight.
Historical Perspective
If most companies were to document their chain-monitoring programs, you should not be surprised to find statements such as, “Replace chain when conveyor malfunctions during production,” or “The last chain replacement was about five years ago, and it’s due.” Even what is viewed as a proactive program for chain-wear monitoring has historically used the method of choosing an arbitrary sample of a nominal 10-foot section of chain and physically measuring it for stretch, which would indicate wear. Obviously, there is a significant degree of risk in using this approach.Sampling plans are dependent on the sample providing information that is consistent with the condition of the entire system. Limiting inspection to a 10-foot section of chain within a 1,000-foot-long system sets up a situation where the likelihood of actually sampling the area of worst wear provides detection “odds” that even a Las Vegas gambler would find unacceptable.
Another concern is how accurately measurements are being produced when the measurement device is a standard hardware-quality tape measure. The historical alternative — visual inspection of the chain — can certainly identify chain wear, but once again can the production schedule tolerate the extreme downtime of such a labor-intensive approach, which needs a stationary chain to do an adequate inspection? Many types of chain are lubricated or painted, and those same coatings that protect chain from wear and corrosion mask typical wear indicators when performing visual inspections.
The last approach that is often used is that of periodic replacement based on chain age. This system of assuring chain reliability may help to reduce production downtime, but the cost of replacing reliable chain just because it is due can never be recovered.
Infrared Photoelectric Chain-wear Monitoring
Infrared photoelectric instruments specifically designed for chain-wear monitoring typically use referenced technology to accurately measure the distance between the leading edges of each center link on the chain. With accurate link-to-link measurements, these monitors can easily identify individual links or pins that show signs of abnormal wear.The unit pictured below is a portable battery-operated device capable of monitoring all combinations of 3-, 4- and 6-inch chain. Alternate units are available that are designed for single-pitch chain. These monitors are capable of in-motion monitoring of chain to allow the inspection to be performed without disruption of production.
If permanently installed units are utilized, continuous monitoring of the chain can be accomplished instantaneously, identifying any chain links that exceed the programmed limits. Both status monitoring units and permanently installed units identify any link that is outside of preset size lengths through illumination of alarm lights identifying the specific problem area. Most units will provide the operator with options as to how data can be processed, including alternate avenues for monitoring, data review and problem-area identification.

A portable infrared photoelectric chain-wear monitoring system mounted on a conveyor.
Automated abnormality identification and marking systems identify each link that is above the wear threshold, and if combined with trend-analysis software monitoring, either periodic or continuous scanning will allow for planned replacement of chain only when it is truly needed. Trending software requires a defined start/stop point to enable accurate comparisons. This is usually accomplished through a uniquely identified link installed in the system.
An option for start/stop link identification can be accomplished by permanently mounting a magnet assembly in the chain itself, which will automatically signal the unit to start and stop the data-recording sessions each time the magnet passes unit sensors. This option provides easily understandable data presentation.

An example of reporting software showing a bar graph of link set measurements.
Several unique features that can be obtained from specially designed software allow for valuable analysis tools such as adjustable span length acceptance criteria, data-recording measurement ranges (individual link, individual link sets or 10-foot sections), trending overlay and charting options.
Accuracy
In normal usage chain, the majority of chain wear occurs at the friction points. The friction points are those areas where the pin engages the center link. Wear occurs on the center pin itself, on the inside of the center link or in most cases a combination of both. Manufacturers supply replacement growth charts that provide a value to determine the maximum length of “chain growth” that is recommended as a guideline for chain replacement. This is usually based on inspection data that is gathered from the commonly performed nominal 10-foot measurement technique. An example would be that a 10-foot section of new chain measured at 120 inches should be replaced when it reaches 124 to 124.5 inches in length.A concern that should be recognized is that wear may or may not be evenly distributed across that measured section of the chain. The wear on one link may be much more severe than on an adjoining link. This type of condition presents the possibility of a chain on the verge of failure measuring well within acceptable tolerances.
The use of individual-link measurement technology eliminates this type of error, increasing the reliability of the inspection and reducing the risk of catastrophic chain failure. A scanning infrared photoelectric system provides accuracy within 0.02 inches. This is even more significant when the user recalls that this is being measured on in-motion chain.

This system is equipped with an automatic paint-sprayer marking system designed to mark individual links that are not found to be within acceptable tolerance limits.
Operating Personnel
Although operation of standard infrared photoelectric chain-monitoring systems is not much more difficult than the operation of a typical desktop personal computer, there are considerations that should be evaluated when operating this type of system. The first and most important is safety. Anytime personnel are required to physically work around moving industrial equipment, there are safety issues that need to be carefully monitored. At a minimum, safety training should include OSHA safety training and plant-specific safety review. Lockout-tagout procedures must also be followed to prevent chain movement during monitor installation and removal.Depending on the type of unit being inspected, operator training needs to address powered chain unit operation (conveyors, cranes, lifts, etc.), unit installation, line walk-down requirements, software operation, file storage and recovery, and data interpretation. Often two-sided access to chain is not possible and may require sight cut-outs. This operation requires an individual who understands the load requirements of various types of units to prevent structural weakening of required supports. Since this type of inspection is reliability-based and is not a code, requirement acceptance criteria need to be established in order to provide useful data.
The development of maximum growth tolerances requires individuals with experience in its development. Recommended training and experience may vary, but a good guideline would include 30 hours of classroom-style training covering all related subjects and a minimum of six months of hands-on experience before considering an individual qualified to perform inspections independently.
The utilization of infrared photoelectric technology to accomplish chain monitoring is a major improvement leap in this important part of a company’s reliability program. The cost savings alone justify the research as to the applicability of this technology.
A recent example of cost savings was developed by a meat-processing company that used the nominal 10-foot measurement technique for inspection prior to implementation of this technology. Over a two-year period, their incidents of breakdown were reduced by 100 percent (from an average of seven breakdowns per 12-month period to zero unscheduled breakdowns).
It was calculated that each breakdown cost the company $2,416 in maintenance repair costs, $3,765 in lost labor time and $1,184 in production revenue. The total cost to the company was $51,555 annually. Additional cost savings were realized in chain-life extension, replacement-part inventory reduction, planned maintenance scheduling and extended-chain replacement.
This is only one of many examples in which, if chain dependability is critical to plant production or safety of personnel, the utilization of individual-link inspection methods are self-funding in their application.
No comments:
Post a Comment